

This blog’s second-ever most popular post appeared a year ago, on Feb. 1, 2012. In honour of the 32nd Annual Guelph Organic Conference taking place this weekend, and Cathy’s Crawly Composters, and all the nourishment it brought our new vegetable garden last summer (and by extension us), I am reposting it today. I have, however, replaced the term vermiculture with vermicomposting.
This weekend I brought home a brand new Worm Chalet. Finally, after having only thought and talked about it for years, I’ve embarked on a new venture: vermicomposting. Even in cold winter climates like Canada, you can make compost throughout the year. You do it indoors with red wrigglers.
I love this technology because it is simple and can be done by anyone. With the right worms, you don’t need a backyard to produce your own compost. So while this simple tool will produce quantities of fertilizer for the vegetable garden I intend to plant this spring, it would be just as useful for someone living in an apartment. It could provide organic fertilizer for a windowsill garden, a city plot, or a neighbour or friend. Even if you don’t live on the land, you can participate in the natural cycle. This harmonizes with the principles of permaculture.
On Sunday I went to the 31st Annual Guelph Organic Conference mainly with the purpose of buying heritage vegetable seeds. I went with the same sole purpose two years ago and never made it past the first seed vendor near the front door of the University Centre. Fortunately this time my partner and I went further, browsed past most of the exhibitors on two levels and brought home lots of seeds and organic chocolate. Most exciting though, we found Cathy’s Crawly Composters.
Cathy Nesbitt had two different composters available. One was a simple setup in a plastic bin. These are easy to make yourself. Worm Composting Canada gives instructions how to make one in a Rubbermaid tub. The challenge with this type of design is that you have to set up more than one to generate a continuous supply of compost for your garden or indoor plants.
The beauty of Cathy’s Worm Chalet is that you don’t have to handle the worms (but maybe you want to!) except when you first assemble it. Besides, it’s clean and compact. Once established it will keep you rich in compost indefinitely. Okay, at around $240 plus tax the worm chalet was a bit of a splurge. Cathy’s simple tub type composter costs about $100. Anyone patient and thrifty enough to shop for individual supplies could put one together for considerably less than that. In six months you will hit pay dirt.
We hit the organic conference near closing time on Sunday afternoon. Cathy was sold out of worms, but she mailed them Monday and they arrived safely overnight. So yesterday we assembled the composter. Here’s how.
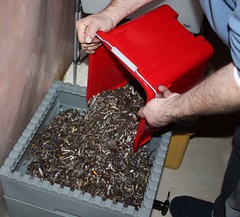
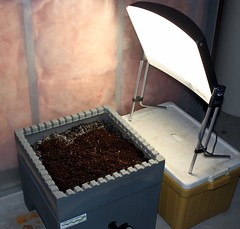
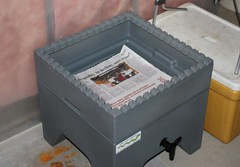 Set up the composter somewhere out of the way where it will stay relatively cool, between 15°C and 20°C. A basement like ours is ideal. Here you can see the base with the bottom tray nested in it. The spigot allows you to drain any excess moisture. This “worm tea” can be recycled back into the compost or diluted with water to feed your plants. Each tray has a screen bottom. For initial setup of the first tray only, cover the screen with a page of newsprint.
 Prepare the bedding. Cathy’s kit provides enough shredded newspaper for the first tray, plus a coir brick, enough for three trays. This is coconut hull fibre. You saturate the fibre with water then mix it with the newspaper.
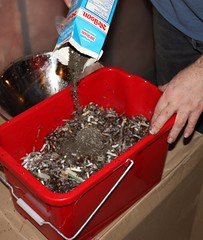 Innoculate the bedding with a little mature compost or soil (Cathy’s kit includes some in a recycled container). This introduces the micoorganisms to help the worms break down organic materials. Mix it into the bedding. As the compost matures, you will need to add more bedding. Just like a regular compost pile needs the right balance of carbon and nitrogen, so does the worm composter. Bedding is carbon-rich material such as shredded newspaper, cardboard, egg cartons and brown leaves.
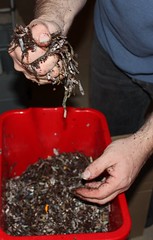 The bedding should contain just enough moisture, the same dampness as a wrung out sponge. Squeeze a handful. If a few drops of water run out, it is just right.
 Spread the bedding in the bottom tray.
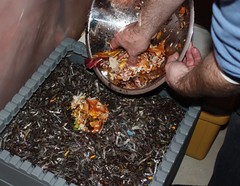 Add worm food. Food scraps, especially fruit and vegetable material that has just barely started to rot, is ideal. Worms will eat about half their weight in food scraps and half their weight in bedding daily. Add about half a pound at a time, several times a week. Do not overfeed. Do not disturb the worms every day. Include a handful of egg shells weekly to reduce acidity. Some starchy food scraps are okay, but avoid fats and meat. Always bury the food scraps with a little bedding to deter fruit flies and other pests. If you can’t bury it well enough, it’s time to add some more bedding.
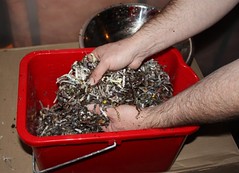
 A two-pound package of worms in compost came wrapped in several layers of newspaper.
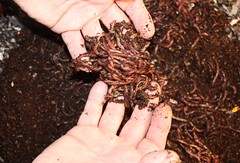 Red wrigglers are the right kind of earthworm for this kind of composter. The most familiar kind of garden worm, the night crawler, lives in deep soil burrows and will not survive well in shallow layers such as this. Red wrigglers like living right in the compost. They are readily available as fish bait.
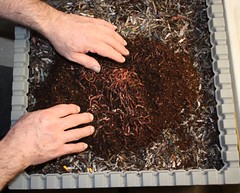 Spread the worms on top of the bedding. It’s not as exciting to watch as a salt water aquarium, still there’s some entertainment value.
 It is essential to introduce the worms to the composter under direct light. Their photophobic tendency will cause them to crawl down into the bedding and discover their new home. The light in our basement is not very bright, so I used my light box. Leave them this way for half an hour.
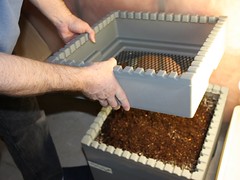 Once the worms have settled in, finish assembling the composter. The Worm Chalet comes with two additional trays, which stack one on top of the other.
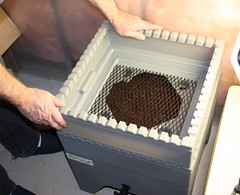 We will continue to use the bottom tray for a couple of months until it fills and the worms become established. Don’t move on too quickly because the bedding will compact. It’s not time to start another tray until the compost makes good contact with the bottom screen, because the worms need to migrate upward of their own accord. With subsequent trays you do not cover the screen with a layer of newsprint, just supply it with bedding and some food.
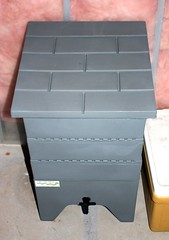 Finally the Worm Chalet is fully assembled. The snug-fitting top keeps out pests and keeps the worms’ home dark and moist.
A year later the colony of worms still thrives voraciously in our basement, slightly genetically fortified by a few red wrigglers from the chicken poop donated by my friend Doug Clark last spring.
Cool! I should try this myself. We generate a lot of food scraps since we both cook from scratch for the most part, but at this time of year, the stuff just freezes in the bin outside. Is it ok to add used coffee grounds to the mix?
Yes, you just have to avoid making the compost too acidic; the worms won’t like that. So if you make coffee every day, you might still need to put some of the grounds outside. Adding egg shells will buffer it. Also, don’t add too much citrus or onion.
Recycling and vermicomposting , almost like two sides of a coin ! Did happen to view an interesting site, http://www.happyworms.ca , wanted to share !