

This weekend I brought home a brand new Worm Chalet. Finally, after having only thought and talked about it for years, I’ve embarked on a new venture: vermiculture. Even in cold winter climates like Canada, you can make compost throughout the year. You do it indoors with red wrigglers.
I love this technology because it is simple and can be done by anyone. With the right worms, you don’t need a backyard to produce your own compost. So while this simple tool will produce quantities of fertilizer for the vegetable garden I intend to plant this spring, it would be just as useful for someone living in an apartment. It could provide organic fertilizer for a windowsill garden, a city plot, or a neighbour or friend. Even if you don’t live on the land, you can participate in the natural cycle. This harmonizes with the principles of permaculture.
On Sunday I went to the 31st Annual Guelph Organic Conference mainly with the purpose of buying heritage vegetable seeds. I went with the same sole purpose two years ago and never made it past the first seed vendor near the front door of the University Centre. Fortunately this time my partner and I went further, browsed past most of the exhibitors on two levels and brought home lots of seeds and organic chocolate. Most exciting though, we found Cathy’s Crawly Composters.
Cathy Nesbitt had two different composters available. One was a simple setup in a plastic bin. These are easy to make yourself. Worm Composting Canada gives instructions how to make one in a Rubbermaid tub. The challenge with this type of design is that you have to set up more than one to generate a continuous supply of compost for your garden or indoor plants.
The beauty of Cathy’s Worm Chalet is that you don’t have to handle the worms (but maybe you want to!) except when you first assemble it. Besides, it’s clean and compact. Once established it will keep you rich in compost indefinitely. Okay, at around $240 plus tax the worm chalet was a bit of a splurge. Cathy’s simple tub type composter costs about $100. Anyone patient and thrifty enough to shop for individual supplies could put one together for considerably less than that. In six months you will hit pay dirt.
We hit the organic conference near closing time on Sunday afternoon. Cathy was sold out of worms, but she mailed them Monday and they arrived safely overnight. So yesterday we assembled the composter. Here’s how.
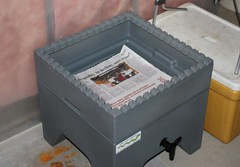 Set up the composter somewhere out of the way where it will stay relatively cool, between 15°C and 20°C. A basement like ours is ideal. Here you can see the base with the bottom tray nested in it. The spigot allows you to drain any excess moisture. This “worm tea” can be recycled back into the compost or diluted with water to feed your plants. Each tray has a screen bottom. For initial setup of the first tray only, cover the screen with a page of newsprint.
 Prepare the bedding. Cathy’s kit provides enough shredded newspaper for the first tray, plus a coir brick, enough for three trays. This is coconut hull fibre. You saturate the fibre with water then mix it with the newspaper.
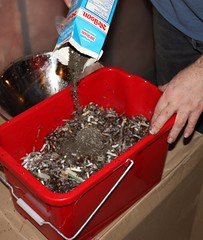 Innoculate the bedding with a little mature compost or soil (Cathy’s kit includes some in a recycled container). This introduces the micoorganisms to help the worms break down organic materials. Mix it into the bedding. As the compost matures, you will need to add more bedding. Just like a regular compost pile needs the right balance of carbon and nitrogen, so does the worm composter. Bedding is carbon-rich material such as shredded newspaper, cardboard, egg cartons and brown leaves.
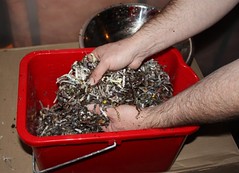
 The bedding should contain just enough moisture, the same dampness as a wrung out sponge. Squeeze a handful. If a few drops of water run out, it is just right.
 Spread the bedding in the bottom tray.
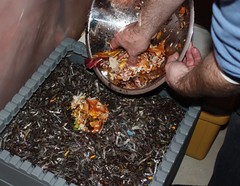 Add worm food. Food scraps, especially fruit and vegetable material that has just barely started to rot, is ideal. Worms will eat about half their weight in food scraps and half their weight in bedding daily. Add about half a pound at a time, several times a week. Do not overfeed. Do not disturb the worms every day. Include a handful of egg shells weekly to reduce acidity. Some starchy food scraps are okay, but avoid fats and meat. Always bury the food scraps with a little bedding to deter fruit flies and other pests. If you can’t bury it well enough, it’s time to add some more bedding.
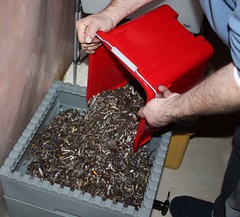
 A two-pound package of worms in compost came wrapped in several layers of newspaper.
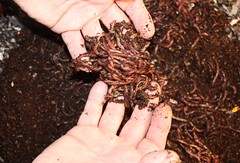 Red wrigglers are the right kind of earthworm for this kind of composter. The most familiar kind of garden worm, the night crawler, lives in deep soil burrows and will not survive well in shallow layers such as this. Red wrigglers like living right in the compost. They are readily available as fish bait.
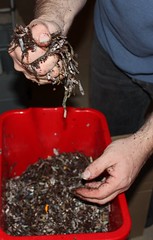
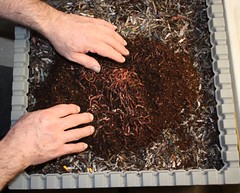 Spread the worms on top of the bedding. It’s not as exciting to watch as a salt water aquarium, still there’s some entertainment value.
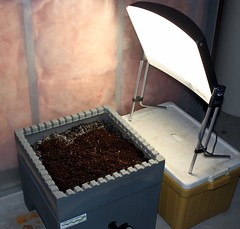 It is essential to introduce the worms to the composter under direct light. Their photophobic tendency will cause them to crawl down into the bedding and discover their new home. The light in our basement is not very bright, so I used my light box. Leave them this way for half an hour.
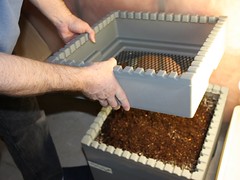 Once the worms have settled in, finish assembling the composter. The Worm Chalet comes with two additional trays, which stack one on top of the other.
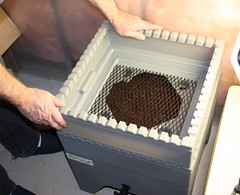 We will continue to use the bottom tray for a couple of months until it fills and the worms become established. Don’t move on too quickly because the bedding will compact. It’s not time to start another tray until the compost makes good contact with the bottom screen, because the worms need to migrate upward of their own accord. With subsequent trays you do not cover the screen with a layer of newsprint, just supply it with bedding and some food.
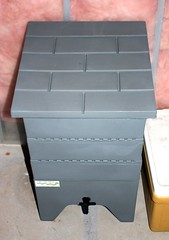 Finally the Worm Chalet is fully assembled. The snug-fitting top keeps out pests and keeps the worms’ home dark and moist.
Awesome post Van! I’m planning on trying out my hand at vermicomposting either this winter or next. I have to make space in our little 2nd floor apartment for a chalet before I take the plunge. Until then, I keep making a compost lasagne in the compost bin out back. It will be cooking in a couple of months!
Great, I hope this inspires you! The thing is amazingly compact, just 20″ square and 30″ tall. The Rubbermaster tub type would fit under the sink. Good luck, and if you try it, let me know how it works out.
I have made really good cmopost in a terrace. Just get a small trash can where you can put what you want to cmopost. Throw in kitchen scraps every day as you get them and also some shredded newspaper to keep an adequate nitrogen-carbon ratio. Specially at the beginning add some soil to get some organisms to start the job. In my experience, the key to success is that you have to turn it every day. This way the cmopost is always well aerated so decomposition is aerobic and therefore there will be no smell and the excess humidity will evaporate. It also makes it more difficult for bugs to lay eggs or be around it. If the weather gets too hot cover the cmopost so it doesn’t dry out too much. If there is too much humidity turn it over more often (maybe twice a day) and add more newspaper to soak up water. It’s not as much work as it seems, it only takes a couple of minutes to turn. I’ve been growing houseplants and veggies in it for a while now and it’s worked really well.
Welcome, Marta. This is an excellent tip, especially for apartment dwellers who want to get involved in composting. Thanks for your comment.
Great “how to” post. I’ve been at this for a year and a bit now. Going great. I started with a couple of styrofoam coolers and purchased the “Worm Factory” after about 6 months. (I went with the “Worm Factory” rather than the “Worm Chalet” based purely on name… I wanted the little squirmers working, not loafing in the chalet)
Yes, I forgot to mention that the worms are working animals, not pets! The Worm Factory looks like another great product, and it’s also a little more economical. The design of the Worm Chalet is pretty cool, and Canadian buyers will like that it is made in Canada.
vermicosmpot contains worm poo which gives that cosmpot the higher rating as far a quality goes . it’s made in smaller batches, with more easily digested tidbits so happens faster as long as ratios are controlled smell is of no consequence in either method . to me, vermi is for folks with greenhouse/potted houseplants and regular cosmpoting is for gardens . vermi could’nt keep up with the needs of my suburban plot ..
Yes, vermicomposting is also excellent for apartment dwellers or other people who cannot compost outside. A worm chalet does not take up much room and produces small quantities of compost quickly.
I bought my first Worm Chalet about 9 months ago. I have since added two more to my collection. Between Chalet # 2 and # 3, I bought a Worm Factory. Running this system along the Worm Chalet is like racing a Focus against a BMW. The Worm Chalet out performed the Worm Factory by 2 months (for the same quantity of end product). The biggest problem with the Worm Factory is that there is hardly any air circulation. The top tray sits directly on the bottom tray, which causes the compost in the bottom tray to compact and go aerobic. Worms, and the composting process requires air flow. I have since dismantled the Worm Factory and transferred the content to my 3 rd Worm Chalet. As predicted, the population of worms have grown, and the process is now moving at a faster rate. The only positive thing about the Worm Factory is that it gave me an idea on how to speed up the migration of worms from the bottom to the top tray in the Worm Chalet. I do this by mounding up the compost in the bottom tray to touch the base of the top tray of the Worm Chalet. I was originally told that the “legs” of the tray will provide a path for migration, but I found my method works better.
Good luck Van, I know you will enjoy your Worm Chalet.
Thanks for sharing your experience. This is a valuable comparison of the two products.
After taking a couple weeks to settle in, my worms appear to be off to the races!
I started a vercsmompoit bin a little ago. I don’t know how many worms I have because I was given the worms by another vercsmompoit user. I’m a newbie in this, so I didn’t know I had to make a newspaper bedding for the worms, or even how much I should feed them. After realizing too late that I had overfed them (mold was beginning to grow on the food) I decided to take all the moldy food out as much as I can. My brother suggested dumping a lot of soil over them to re-create’ their environment (I’m using red-wigglers btw) and perhaps make all the fruit flies go away (yes there were lots of them).My question is, is it ok to dump soil over the food instead of making a newspaper bedding? (It is my understanding that the food goes under the bedding). The soil I dumped over the worms had nutrients/fertilizers cuz I was coincidentally transplanting a tomato plant to a bigger pot and decided to get nutrient-rich soil.Somehow I fear for those worms’ lives. Any help would be appreciated. Any tips on how to care for them? Thanks!
Adding the right kind of bedding is essential because it contains carbon, because the worms need it in their diet and it balances nitrogen in kitchen scraps and other compostable materials. This also applies to a traditional compost pile, by the way.
Newspaper is great for bedding because most people have access to some. If you don’t have a paper shredder, you can just tear it by hand into narrow strips and then into pieces. Newspaper has a grain to it, so try tearing in different directions until you find which is easiest. But there are lots of other things you can use besides newspaper: corrogated or other brown cardboard, egg cartons, scrap paper, tree leaves, straw, or essentially any organic material that is dry, high in cellulose and free of chemicals. Tear it or cut it up into the smallest pieces possible because there has to be a lot of space for air to pass through. I like straw best because it is already in fine shreds so I can throw it in whole. However, the worm farm is a great way to dispose of scrap paper and newspaper so I try to give the worms a variety. The bedding should be as damp as a wrung-out sponge.
Start by putting some bedding on the bottom of the tray. Cathy’s Crawly Composters recommends adding a bit of moist coir (coconut fibre) and some soil or mature compost to the bottom layer so inoculate it with good bacteria, which helps in the composting process. Pile about a litre of food scraps in the middle of the bedding. Then pile more bedding overtop. The idea is to keep the food enclosed in bedding always. When you add more food, you can dig a hole and put it inside the bedding, then cover it again, but if the food is hard to cover, it is time to add more bedding on top. You need to keep adding equal weights of bedding and food.
It is good to add a little soil whenever you set up a new tray, but do not use it for bedding. It does not have the right carbon content, which the red wrigglers need. Also it may not allow enough oxygen into the middle of the bed. The worms need air, and so does the compost pile. To test whether it is working, open a hole in the middle and take a good sniff. If it smells like rotting garbage, the pile is out of balance and you need to add more bedding. If it smells like dirt, that’s just right.
This is timely! I’ll be moving soon and likely won’t have the luxury of a garden compost heap like I do here. I’ve been looking at getting a bokashi bin, but I may look at a proper worm farm if I have the space (and garden to spread the casings on).
Thanks Van!
Bokashi composting is new to me. Very cool!
if you have a contained veoosrmpict, you get to use the tea’ and the castings where and how you wish and you could even give or sell some .. in your compost pile, you get the same, but you can’t separate it out ..it’s also not got to be so big a good compost pile needs to be about three ft square . a goodly vermi- can be in a rubbermaid box that fits about anywhere! .
Definitely Red Wigglers. They eat more and are perfect for vetmicomposring for several reasons. They hate light and will not try to escape, but rather will burrow down into your compost. They have the perfect digestive system and they reproduce quickly if there is plenty of food. I do compost with worms using the Worm Factory 360. It makes separating the worms from the castings mostly automatic. After one tray is full, you add food to the next level and some of the worms will crawl up to it. Others will stay below and finish eating the first tray until there is nothing left to eat. At that time, you move that tray to the top level and leave it open so that the light will send the worms back down to the current feeding tray. After a day (leave the light on at night), most of them will have left the tray full of worm castings. There will some who didn’t leave and you can pull them out if you find them.If you don’t use a multi-level system like the Worm Factory, you can try to feed worms in one area of the bin and then move to another area and hopefully most of the worms will move out of the first area when it has no food left, then you can harvest the castings in one area of the bin at a time. I haven’t done it this way, but suspect it’s not quite as easy.Overall, I would say that worm composting is fairly easy and actually quite amazing. I think you’ll enjoy it no matter what type of bin you use.
These are some good tips for managing the worms, and they will work equally well with the Worm Chalet. Thanks for your comment, Rubi.